New Year’s Towel with Applique
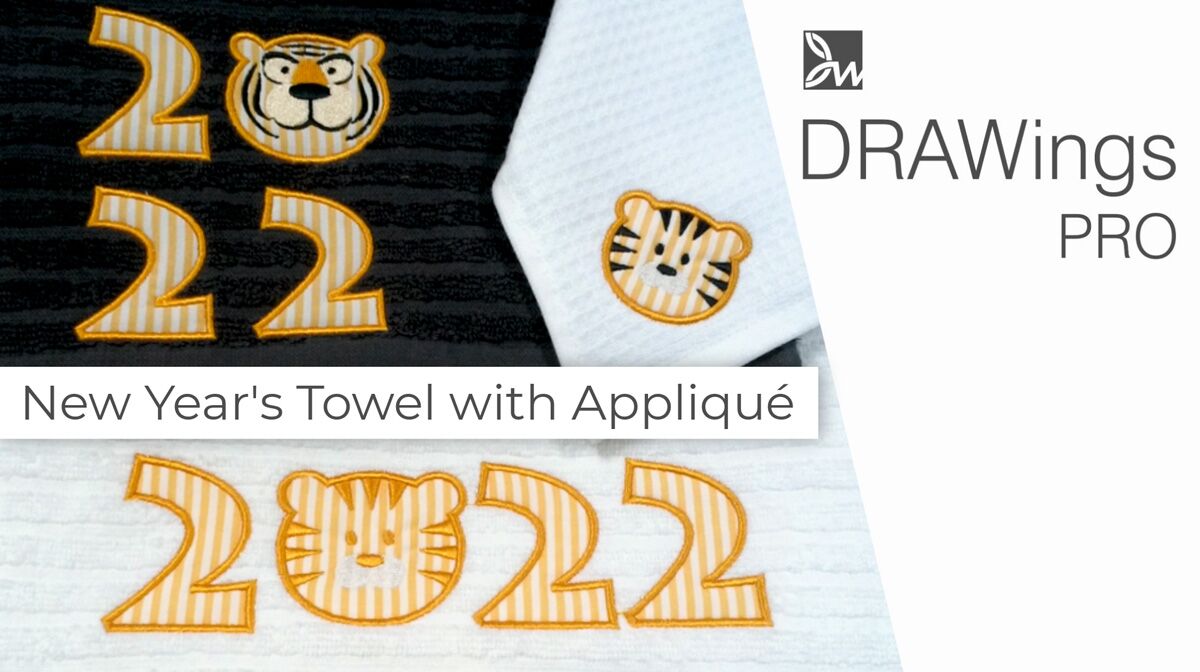
In this video, we will show you how to make a towel with applique for 2022.
View the video below to learn how to do it!
Since 2022 is the Year of the Tiger, we chose a rather cute appliqué to mark this New Year. Stay with me to show you how to make it!
Create the 2022 Text shape
Let’s begin with a blank design. For this project we are going to use a 40cm wide towel, so the hoop closest to that size is the 23 by 23 cm or 9 by 9 inches hoop.
Start with Text tool from the Lettering section, enter “2022” in the text, select a Font and size, and set the color to get closer to the finished image. Then right click on the Text object and use the “break apart” option to split it into individual numbers. Select the zero (“0”), right click and click “Convert to curves”. This will allow us to edit the shape using the Node editor.
Create the Tiger design
Since we want to remove the hole, we need to select all inner nodes. Right click on any of the inner nodes and use “select polyline” option and press the delete key. We are trying to shape this into a tiger’s head. First we will start the ellipse tool to create the tiger’s ears and once you have one ear ready, select it and press Duplicate button to create one more for the other side.
Then move the duplicate horizontally to the other side of the head. If you hold the Ctrl key pressed down, you make sure that you are moving parallel to the axis. After placing the ears, select both ears and then the face. Click the “Weld” option from the “Shaping” to combine the ears and face into one object.
To draw the stripes, select the “Outline shape” option from “Digitize” to draw the tiger’s stripes. Using the node editor you can fine-tune the shapes. Once you have a set of stripes ready, you can make copies and place that on the right side and on the top of the head.
Select the stripes, press on the “Duplicate” button and then “Mirror X”. Move the new set of stripes to the left side. Likewise, make another set of stripes and then rotate them by 90 degrees. This time, move them to the top of the head. Take your time to fine tune the placement of the stripes as best as you like them. You may also adjust the shape of the stripes using the node editor. Select all the stripes, select a fill color and remove the outline color.
Then we need to select all the numbers of the year, together with the shape of the tiger’s head. Right click and use the “Combine” option to turn them into one object.
Make the Tiger applique
Select the tiger object and from the “object properties” toolbar, select the “Applique fill” type. The tiger object will look like fabric, and it will not have stitches anymore.
At this point, we need to select a Satin fix for the applique decoration. Again, using the ellipse tool, we shall create the eyes. Create a small ellipse, at the position of one eye. Make a duplicate and move it to the position of the other eye. Set the same color and following the same procedure, create the whisker pad.
Using the ellipse tool make two circles and place them in a way that they slightly overlap when you slide them horizontally. Select both and use the “Weld” option from the shaping menu to make them one.
Finally, create the nose with the “Ellipse” tool. Apply the color and remove the outline. Fine-tune the shapes and stitch types to complete the tiger.
Re-sequense the design
At this point, you may want to take a close look at the sequence manager on the applique part. Remove overlaps are automatically applied for the stripes which are on top of the applique. But for this design, we don’t want those stitches, so select the stripes, eyes, mouth, and nose and from the “Properties” bar, go to the “Remove overlaps” option and set it to “Never”.
If you look at the embroidery order at this point, the tiger stripes will be embroidered on top of the satin fix stitches. If you embroider in this order, the finishing will not be beautiful. In this case, it would be better to set the embroidery order to manual. To do so, first, click on the “Auto” button that you will find on the top toolbar. The auto sequence functionality is now disabled and we can manually re-order the design. As you may notice, the number of objects which are to be sequenced has increased by setting it to manual.
Still, the order of the appliqué outlines cannot be changed yet. To make that possible, click “Optimize”, select “Advanced” and click “OK”. The appliqué is now separated into position mark, tacking stitches, and fix stitches so each of them can now be reordered.
Drag the tiger’s satin fix stitch after the tiger’s stripes and then Switch to slow redraw to check on the new sequence. The positioning stitches were added and then the machine stops. This is for you to place the applique fabric.
Continue with the fixing stitches and the machine will stop once more for you to cut the excess fabric. Then the stripes, eyes, mouth and nose will be added and finally the satin fix. If everything in your sequence is just as described, then you are ready to go!
Embroider the design
Have in mind that, if you print the design at 100%, the printout will help you position the design on the towel accurately. Once the design is ready, prepare it for the machine.
Don’t forget to gather all the materials you need! That is a towel, the Applique fabric, tear-away stabilizer, water-soluble foil, adhesive spray and of course the assorted threads. Don’t forget the right hoop and the printout.
You are ready to start. Hoop the stabilizer, draw a vertical centerline and make a mark at the vertical center of the towel.
Mark the position of the horizon, place the towel on the hoop and secure the towel to the stabilizer. We use an adhesive spray for the tear-away stabilizer, but you can use a different type of stabilizer or use pins to secure the towel; whatever is convenient for you.
Place the pile cloth film on the towel, secure it with pins and you are ready.
Open the design, set the bobbin and the upper thread and press “Start”. The machine will now sew placement stitches that indicate the position of the appliqué. place the appliqué cloth and press “Start”; the machine will now sew tacking.
Remove the hoop from the sewing machine, cut off any unnecessary parts of the appliqué cloth, attach the hoop to the machine once again, change the thread and press “Start” to proceed with the embroidery part.
Continue embroidering with the necessary thread changes. When the embroidery is complete, remove the hoop from the machine and remove the pins, film and stabilizer. Peel off the stabilizer, being careful not to pull on the pile.
It’s ready!!
This was our take of this design.
Feel free to make your own version, experimenting with different placements or different types of stripes and don’t forget to share it with us!
DRAWings PRO Help Group
Happy crafting and don’t forget to share your creations with us in the
DRAWings PRO Help Group!
You can download the .DRAW file of the project, for free, from the link below:
- Project’s .DRAW file: New Year’s Towel with Applique
It can open only with the latest version of DRAWings embroidery software
Check also, our related project Create Christmas Decoration Angels


