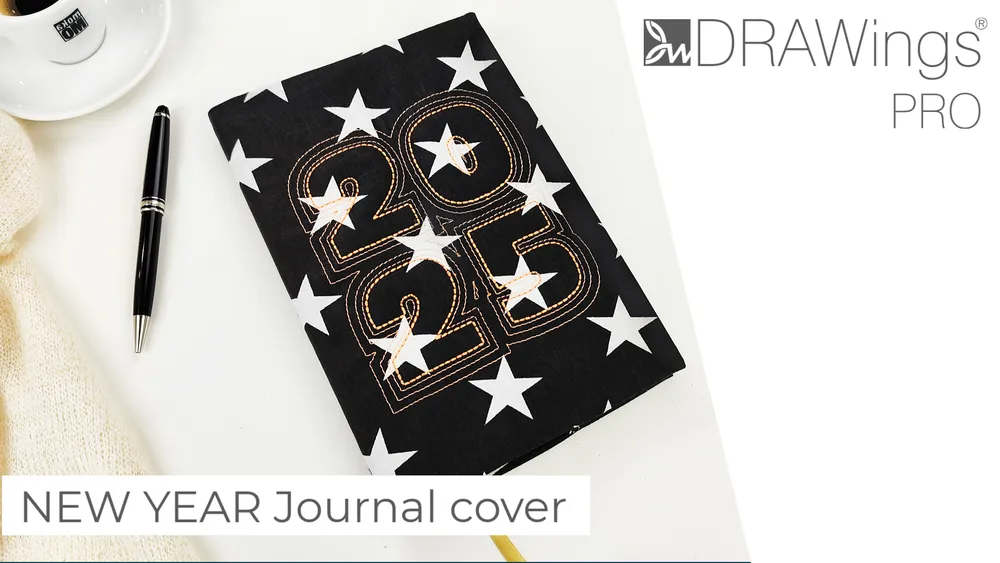
Create a 2025 Journal Cover with Modern Trapunto Embroidery
Create a stunning 2025 journal cover with modern trapunto embroidery is an easy process inside DRAWings PRO embroidery software. Discover how to craft a customized journal cover for the New Year 2025 using a modern take on the traditional Trapunto embroidery technique. Learn to design, embroider, and assemble a unique cover that adds a 3D effect to your journal. Perfect for personal use or as a thoughtful gift, this project showcases the capabilities of our embroidery software. Follow along for a creative journey into the art of Trapunto.
The Art of Modern Trapunto
Traditionally, Trapunto quilting involved carefully stuffing raised areas by hand to create dimensional effects. Today’s digital embroidery capabilities transform this time-intensive process into something both efficient and precise, while preserving the technique’s elegant appeal. Our project leverages these modern tools to create a journal cover that catches light beautifully and invites touch with its subtle dimensionality.
Design Philosophy
When we approached this project, we wanted to create something that would make a statement while remaining tastefully understated. The numbers “2025” serve as our canvas for exploring dimensional embroidery, with each digit carefully positioned to create visual harmony. The design speaks to both the traditional roots of Trapunto and contemporary aesthetic sensibilities.
Getting Started: The Creative Process Before diving into the software
We always recommend spending a moment with your journal to understand its proportions. In this case, we’re working with an A5 journal measuring 16cm in width and 21cm in height. These measurements will guide our entire design process.
Digital Design Creation
Opening our embroidery software, the first step is establishing our workspace. We have found that setting up a precise work area helps visualize the final result more accurately. We’ll create a rectangular workspace matching our journal dimensions: 160mm width by 210mm height. This digital canvas becomes our playground for creativity.
The Typography Choice
For our 2025 design, I selected the font ‘XPG 089’ – a choice driven by its clean lines and modern character shapes that lend themselves beautifully to dimensional embroidery. Setting the font size to 60 points gives us substantial areas for creating depth, while a letter spacing of 6 units ensures each number has room to breathe.
Creating Visual Interest
Here’s where our design takes an interesting turn. Rather than keeping all numbers in a single line, we’ll create a dynamic arrangement by stacking them. The “20” sits proudly above the “25”, with a carefully measured 15mm gap between rows. This composition adds visual interest while maintaining balance – a crucial consideration when working with dimensional designs.
The Digital Trapunto Effect
This is where our software truly shines. We’ll transform simple numbers into a three-dimensional masterpiece through a series of thoughtful settings:
First, we apply an appliqué fill to our numbers. This creates the foundation for our raised effect by generating placement and holding stitches for our batting layer. The outline receives a triple stitch treatment, adding definition and structure to each number.
To enhance the dimensional effect, we employ the auto-border tool in three progressive layers. Beginning with a 2mm running stitch border, followed by 3mm and 4mm outlines, we create a graduated effect that mimics traditional Trapunto’s gentle slopes. This layered approach ensures our design has depth while maintaining clean, professional edges.
Material Selection and Preparation
The success of any embroidery project lies equally in material preparation as in design. For this project, you’ll need:
- Quality fabric suitable for journal covers
- Sturdy stabilizer
- Quilt batting for dimension
- Water-soluble film for smooth stitching
- Coordinating threads that complement your fabric choice
I recommend selecting a fabric with enough body to support the embroidery while remaining pliable enough for book cover construction. A medium-weight cotton or linen blend often works beautifully.
The Embroidery Process
With our design prepared and materials gathered, we move to the exciting part – bringing our design to life. Start by hooping your stabilizer and marking the center point carefully. This becomes your guide for precise design placement.
The embroidery sequence begins with placement stitches, creating a roadmap for your batting placement. After securing the batting with water-soluble film and completing the tacking stitches, you’ll see your design begin to take shape as the numbers are outlined and filled.
Watch as each auto-border layer adds depth to your design. This gradual building of dimension is what gives our modern Trapunto its sophisticated appearance.
Construction and Assembly
The final phase transforms our embroidered piece into a functional journal cover. Calculate your fabric dimensions by adding 3cm to the journal height for seam allowance and 14cm to the perimeter for the sleeves. These precise measurements ensure a professional finish.
Creating the sleeves requires careful marking and folding. Measure 7cm from each short end to create folding lines. These will form the pockets that hold your journal securely in place.
The lining adds a professional touch while concealing our embroidery backing. Cut it 5cm narrower than your outer fabric to reduce bulk in the folded areas.
Final Thoughts
This project exemplifies how modern technology enhances traditional techniques without losing their essence. The software’s precision combined with the tactile pleasure of traditional Trapunto creates something truly special – a journal cover that’s both contemporary and timeless.
Remember, while these instructions provide a framework, don’t be afraid to experiment with different fonts, arrangements, or border patterns. The joy of digital embroidery lies in its flexibility to accommodate your creative vision while maintaining professional results.
As you embark on this project, take your time with each step. The beauty of dimensional embroidery reveals itself in the details – in carefully trimmed batting, precisely folded edges, and thoughtfully chosen thread colors. Your finished journal cover will be more than just a protective covering; it will be a daily reminder of the artistry possible when traditional techniques meet modern tools.
We would love to see your interpretations of this project. Each creator brings their unique perspective to these techniques, and that’s what keeps our craft evolving and exciting.
Happy crafting and don’t forget to share your creations with us in the
DRAWings PRO Help Group!
You can download the .DRAW file of the project and the image used, for free, from the link below:
- Project’s .DRAW file: Create a Stunning 2025 Journal Cover with Modern Trapunto Embroidery
It can open only with the XI and later versions of DRAWings embroidery software


